Step 1: Start sand flow from the left source towards the top-left container.
At 00:01, draw a line from the top-left sand source to guide sand into the pipe leading to the top-left container.
Sand begins flowing into the top-left container.
Complete walkthrough and strategy guide for Sand Loop Level 201. Watch the video tutorial and learn expert tips to beat this level.

Watch this video walkthrough to learn how to beat Sand Loop Level 201. Follow the step-by-step solution.
Master Sand Loop Level 201 with our complete walkthrough. This expert level typically takes 8–15 min to complete. Find tips, video guides, and strategies for this puzzle level.
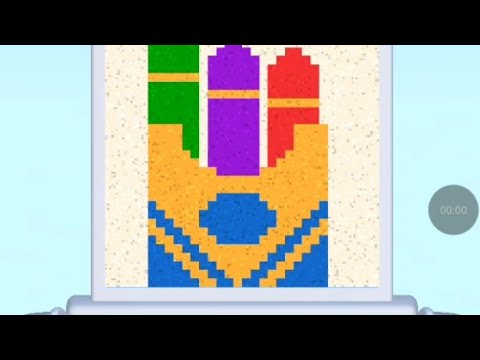
Guide sand from multiple sources to fill three distinct containers by strategically drawing paths to activate yellow switches and push a red block.
| Time | Scene | Action | Common Error | Confidence |
|---|---|---|---|---|
| 00:00 | Level start, initial puzzle layout shown. | Level begins, displaying sand sources, containers, switches, and a red block. | 100% | |
| 00:01 | Player draws first path for left sand source. | Draw path from the top-left sand source towards the top-left container. | 100% | |
| 00:02 | Player draws second path for middle sand source. | Draw path from the middle sand source towards the middle container, angled over the red block. | 100% | |
| 00:04 | Player draws third path for right sand source, hitting first switch. | Draw path from the right sand source to activate the upper-right yellow switch (switch 1). | 100% | |
| 00:05 | Top-right gate opens. | Gate opens, allowing sand to flow towards the top-right container. | 100% | |
| 00:06 | Sand activates second yellow switch. | Sand from the right source continues to activate the lower-right yellow switch (switch 2). | 100% | |
| 00:07 | Bottom-right gate opens, sand flows to container. | Gate opens, allowing sand to flow to the bottom-right container. | 100% | |
| 00:09 | Player extends middle sand path to push red block. | Extend the path for the middle sand stream directly into the red block to push it. | 100% | |
| 00:10 | Red block moved, clearing a path. | The red block is pushed out of the way by the sand. | 100% | |
| 00:11 | Player draws final path for top-left sand, hitting last switch. | Draw path from the top-left sand stream (through the newly cleared area) to activate the last yellow switch (switch 3). | 100% | |
| 00:13 | Final gate opens, sand flows to last container. | The last gate opens, allowing sand to reach the final container. | 100% | |
| 00:26 | Level Completed screen appears. | All three containers are sufficiently filled, and the level is cleared. | 100% |
At 00:01, draw a line from the top-left sand source to guide sand into the pipe leading to the top-left container.
Sand begins flowing into the top-left container.
At 00:02, draw a line from the middle sand source downwards, leading the sand into the middle container's entrance, passing just over a red block.
Sand flows into the middle container.
At 00:04, draw a line from the right sand source downwards, guiding the sand to hit the upper-right yellow switch (switch 1) and then continue to the lower-right yellow switch (switch 2).
The gate for the top-right container opens at 00:05, and the gate for the bottom-right container opens at 00:07, with sand flowing into both.
At 00:09, extend the path for the middle sand stream (already flowing) directly into the red block.
The red block is pushed out of the way at 00:10, clearing a new path.
At 00:11, extend the path for the top-left sand stream (already flowing) through the newly cleared area (where the red block was) to hit the final yellow switch (switch 3).
The final gate opens at 00:13, and sand flows into the last container, leading to level completion.
Q: How do I open the gates for the right-side containers?
A: Guide the sand from the rightmost source to hit the two yellow switches sequentially.
Q: How do I move the red block blocking the path to the final switch?
A: Direct the sand from the middle source to push against the red block once the initial paths are drawn.
Q: Which sand source should be used for the final yellow switch?
A: The sand from the top-left source should be redirected through the path cleared by the red block to activate the final switch.

View Guide →

View Guide →

View Guide →

View Guide →

View Guide →

View Guide →
View Guide →
View Guide →
View Guide →
View Guide →
View Guide →
View Guide →
Share Your Experience
Community Comments (0)
No comments yet. Be the first to share your experience!